Input Actions
In this tutorial, we will be adding a mouse interact feature to the Adventure Game prototype.
To begin, you can download the starter assets that will be used for future tutorials here.
After downloading this zip folder, extract the folder and open the folder within Unity Hub.
This project contains all of the assets will be using in future tutorials. This includes a number of prefabs with animations, as well as a starting player character.
Input Actions Asset
In previous tutorials, we focused on creating separate input actions to store data on the player’s input. In this tutorial, we will learn about creating an Input Action Asset. By default, when creating a new Unity project with the Input System package installed, an Input Actions Asset will be created in your project.
Within our template, I have modified our Input Action Asset to have a different name. You can locate it in our template under Assets > PActions (short for player actions.) In future projects, if you want to create a blank Input Action Asset, you can navigate to your project window and right click to Create > Input Actions. The image for an input action looks like a folded paper with a blue lighting image:

Double clicking on an Input Action will open the Input Action Editor.
Input Action Editor
Unlike when we created individual input actions, the input action editor allows us to store all of our input actions within one asset which we can then access from any script. Looking at our Input Actions Editor, we notice that the UI looks very similar to creating an Input Action in the inspector. We can see that we have a list of actions as well as properties we can change on those actions.
For example, we can notice that we currently have one action for Move which is bound to both the WASD keys and the Arrow keys.
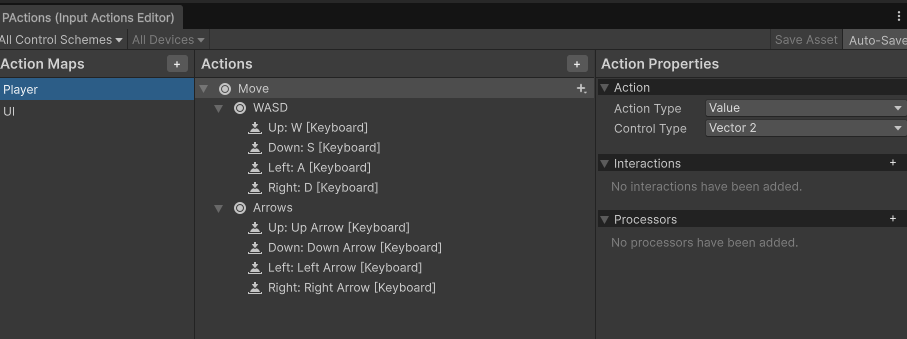
Additionally, we can notice on the left side of the editor we are able to create a variety of Action Maps. Within this project, we will stick to using the Player action map. However if you wanted to group different actions together, as you might want to do if you had, for example, a variety of unique minigames, you could create these actions under separate Action Maps.
Creating an Action
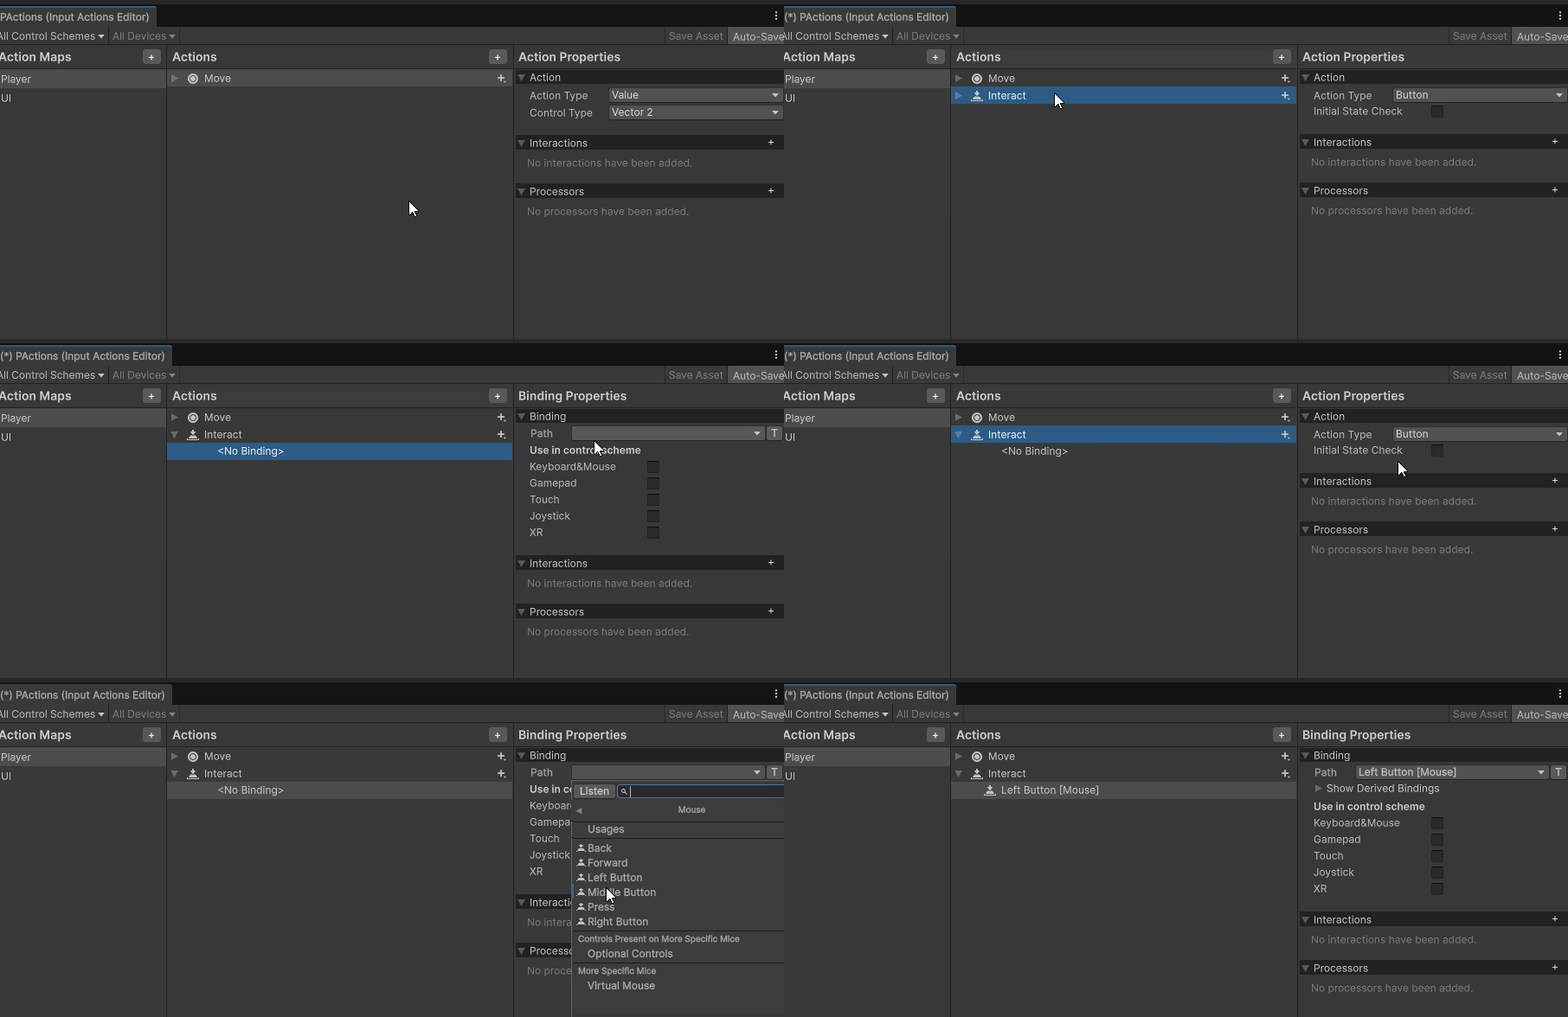
To create an action, you can press the + button within the Actions panel. In this tutorial, we will be creating and Action of Interact and bind it to our left mouse button.
To create an Interact action:
- Press the
+button to make a new Action and name it Interact - Make sure the Action Type in the Action Properties panel is set to Button
- Press the small arrow next to the action name to expose the Binding
- Click on the binding and change the Path to be the Left Mouse Button in the Binding Properties settings
- Make sure to press Save Asset after making changes
Access Input Action Asset in Code
Now that we have an Input Action, how do we access these actions in various classes? There are a few approaches to receiving information about when a player interacts with the input actions, such as looking at Unity Events, however, in this tutorial, we will focus on how we can make a C# class that stores all of our input actions.
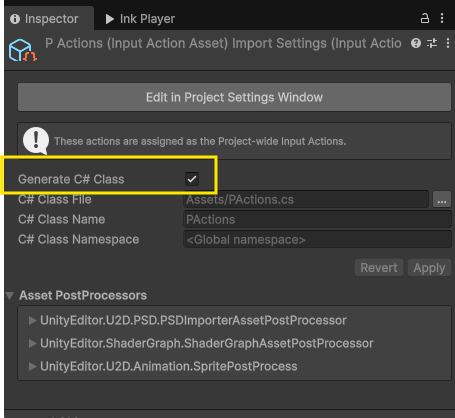
If we click on our Input Action Asset in our Project Panel, we will notice that in the Inspector we have the option to check Generate C# Class. In our template, this should already be checked. By checking this box, Unity will create a C# Class that contains all of the actions of our Input Action Asset. Additionally, this C# Class will update as we make changes to our Input Action.
With this class generated, we can then set up our different scripts to subscribe to different Input Actions, allowing us to call our input actions from any script.
Interactor with Input Actions
To begin a system that will allow us to interact with objects in our scene using our Input Actions, let’s create a C# script name Interactor. We can do this in our scripts folder.
Within this script, we will write some code to create a new instance of our Input Actions class (called PActions), and use this instance to have our class subscribe to various events that are our PActions class publishes.
To begin, let’s make sure we are using the Input System namespace within our script by adding the line of code using UnityEngine.InputSystem;:
using UnityEngine;
using UnityEngine.InputSystem;

public class Interactor : MonoBehaviour
{
    void Start()
    {

    }

    void Update()
    {

    }
}
Next, lets create a variable to hold our new PActions. We can do this by creating a variable of type PActions called inputActions:
using UnityEngine;
using UnityEngine.InputSystem;

public class Interactor : MonoBehaviour
{
    PActions inputActions;

    void Start()
    {

    }

    void Update()
    {

    }
}
Next, we need to create an instance of our PActions as soon as our game begins. In OnEnable(), let’s set our inputActions variable equal to a new PActions:
using UnityEngine;
using UnityEngine.InputSystem;

public class Interactor : MonoBehaviour
{
    PActions inputActions;

    private void OnEnable()
    {
        inputActions = new PActions();
    }
    void Start()
    {

    }

    void Update()
    {

    }
}
Finally, like our individual actions, we need to enable our Input Actions:
    private void OnEnable()
    {
        inputActions = new PActions();
        inputActions.Enable();
    }
Subscribing to Input Action Events
When using and Input Action C# class, one way to get access to when a player engages with an Action, is to subscribe to a C# event. A C# event allows one piece of code of announce something is happening and allows other pieces of code to listen for that event and respond. When Unity generates our Input Action class, it creates an event for each Action, allowing us to subscribe different pieces of code to these actions being performed.
While our PActions class publishes when our Interact action is pressed down, our Interactor class, needs to subscribe to this event.
The question then becomes, what exactly are we subscribing to? Technically, for each Input Action within Unity, there are three events that are called:
- started (when a user begins engaging with an action)
- performed (when a user performs an action)
- cancelled (when a user stops engaging with an action)
In our situation, we just want to see when a player presses down the left mouse button. In other words, we want to see when this action is performed, and then subscribe to this event.
To get access to when our Interact has been performed, we can first call the instance of our PActions, inputActions then call our Action Map, Player, then call our Action, interact, and then finally call our event, performed:
inputActions.Player.Interact.performed
We can add this code after we create a new instance of our PActions:
    private void OnEnable()
    {
        inputActions = new PActions();
        inputActions.Enable();
        inputActions.Player.Interact.performed
    }
Currently, however, we have no method that is subscribing to this event. In other words, we need to create a method within our Interactor class that subscribes to this event, and is called when this event is invoked.
Let’s first begin by creating an new method called OnInteract(). Importantly, methods that subscribe to an Input Action event need to take in a value of an InputAction.CallbackContext. This is a small bit of information that unity sends to the method every time an subscribe input action event is invoked. While we won’t be accessing this variable in our code, you can use this variable, often labeled context, to get values from the input action. You can notice in the Player script in the OnMove() method, the method uses this context variable to get value of the WASD keys and stores this with the moveInput variable:
    void OnMove(InputAction.CallbackContext context)
    {
        moveInput = context.ReadValue<Vector2>();
    }
Within our Interactor script, we do not need to use this context, but we still need to create the parameter. Our OnInteract method should look like this:
    void OnInteract(InputAction.CallbackContext context)
    {

    }
Finally, we need to have this method subscribe to the performed event. To do this, we can use the operator += after our event followed by the name of our method:
inputActions.Player.Interact.performed += OnInteract;
Our OnEnable() script should now look like this:
    private void OnEnable()
    {
        inputActions = new PActions();
        inputActions.Enable();
        inputActions.Player.Interact.performed += OnInteract;
    }
Unsubscribing
Just as we need to subscribe to an event at the start of our game, we need to make sure that we unsubscribe from an event when our game ends. This will prevent our method from subscribing to our event multiple times.
We can create an OnDisable method and make sure the we both disable our inputActions as well as unsubscribe from the performed event by using the -= operator:
    private void OnDisable()
    {
        inputActions.Disable();
        inputActions.Player.Interact.performed -= OnInteract;
    }
Testing Interact
Let’s test our interact system, by adding a debug line to our OnInteract method such as print("Interact"), and then add our Interactor script to our scene to create an empty game object.
At the end of the tutorial, our Interactor script should look like this:
using UnityEngine;
using UnityEngine.InputSystem;

public class Interactor : MonoBehaviour
{
    PActions inputActions;

    private void OnEnable()
    {
        inputActions = new PActions();
        inputActions.Enable();
        inputActions.Player.Interact.performed += OnInteract;
    }

    private void OnDisable()
    {
        inputActions.Disable();
        inputActions.Player.Interact.performed -= OnInteract;
    }

    void OnInteract(InputAction.CallbackContext context)
    {
        print("interact");
    }
    void Start()
    {

    }

    void Update()
    {

    }
}