Raycasting
In this tutorial, we will learn how to cast a ray from our mouse into our scene to select different objects. We will use this combined with our interactor script to return the names of objects we are selecting.
Raycasting is a computer graphics term for sending a line from a particular point in space in a particular direction and recording what that line hits. As and example, this is the basis of the first person shooter genre in which a ray is sent from the end of the projectile weapon, and the ray records what is hit. In our 2D adventure game, we will instead send a ray from our mouse into our scene to keep track of which objects we hit. Within Unity, we can use raycasts to detect colliders within our scene.
Render Order
Before we learn about raycasting, we need to consider the order in which objects within our scene are rendered.
Looking at a game object with a Sprite Renderer such as our Player, we can see that various properties within the Sprite Render control the order in which sprites are rendered.
One main way of controling which sprites are rendered on top of each other is by controlling their Order in Layer property. Those sprite with larger numbers will render in front of other sprites.
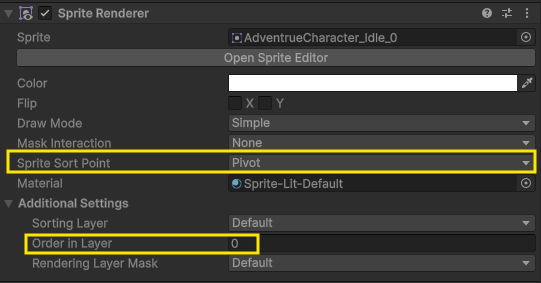
We can also notice that the Player is sorted by Pivot point. The reason for this is that our template is using a unique sorting mode. Instead of sprites being generically placed on top of each other based on their order in the the layer, sprites lower on the Y Axis are rendered in front of sprites that are higher on the Y Axis.
Therefore in order to make sure all the sprites are rendering properly, all of the sprites in our template have been imported to have their pivot point at the bottom of each sprite cell. This means that the pivot or manipulation point for each sprite is at the bottom.
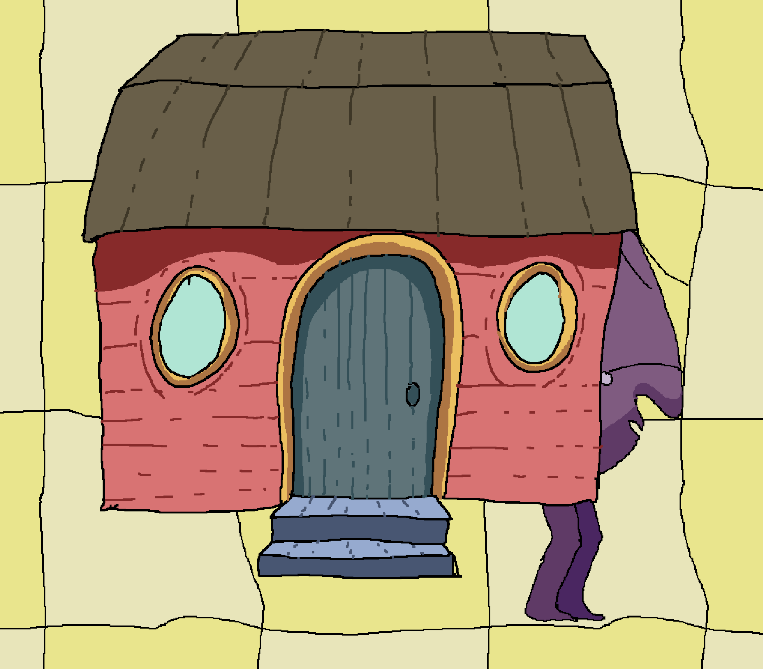
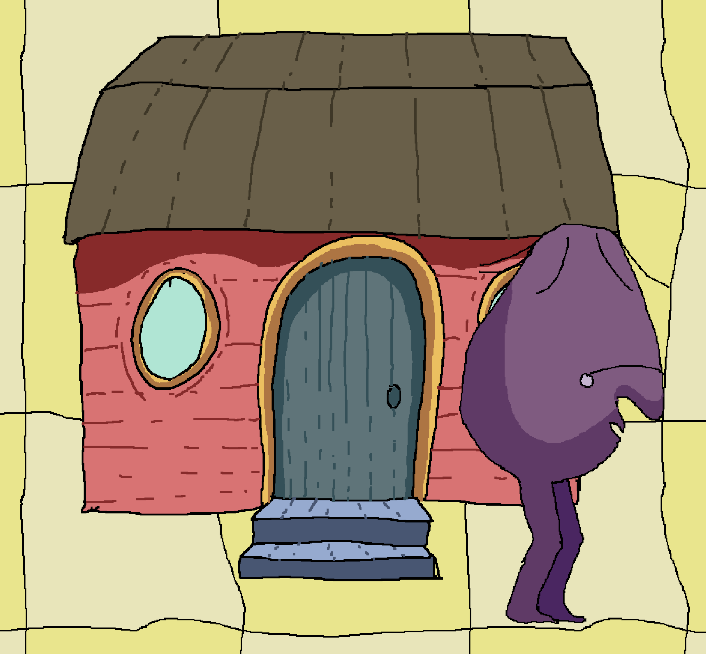
In order for the sprite to be rendered on top of each other based on their Y position, I have edited the Renderer2D settings which can be found in Assets/Settings/Renderer2D. With these settings, I changed the Transparency Sort Mode to be a Custom Axis and set the Axis to be the Y Axis. This allows for a top down adventure game in which images closer to the bottom of the screen render on top of one another

You can see the different sort modes below:
Default Sort:
Custom Axis Sort:
Raycasting Order
An important thing to note about 2D raycasting is that since 2D objects have no thickness, and although objects appear visually on top of one another, if two objects are on top of each other when sending a raycast into our scene, it is a random chance of which object our raycast will hit. To account for this, as we will see later, we need a way of storing all of the objects we hit within an array as well as method for sorting this array. In our case, we know the object that is lowest on the Y axis in the object is on top. We will write the logic for this a bit later.
Storing Mouse Position
Raycasting as an action can be done continuously during play or during discrete moments. In our case, we want to constantly know what our mouse is over, so we will plan to send a continuous ray cast into our scene and examine what we are hitting.
To create a raycast, we first need to find the position of our mouse. Our mouse, currently, does not exist within the space of our world. Similar to our UI, our mouse is not in world space, but in screen space. In this way, we need a way to convert the space of our mouse on our screen, to find where our mouse is in the space of our world.
To do this, we can use a method on our Main Camera called ScreenToWorldPoint(). This takes in a point in world coordinates and converts it to the space of our game. We can provide this method with the position of our Mouse which we can access using Mouse.current.position.ReadValue().
Let’s add this code to the top of our Update method in our Interactor script:
void Update()
{
    Vector2 mousePostion = Camera.main.ScreenToWorldPoint(Mouse.current.position.ReadValue());
}
Collects Raycast Hits
To perform our raycast, we can use a variety of methods. In our case, since we know objects we interact with might be layered on top of one another, lets use the method RaycastAll.
To cast this ray, we need to provide the method with our initial starting point as well as the distance we want our ray to travel. We can set our initial starting point to be our mousePosition variable and set our distance to be Vector2.zero. Since our 2D world is flat, our ray can stay in the initial starting position. Notw that this method is within the Physics2D class, so we first need to call this class:
void Update()
{
    Vector2 mousePostion = Camera.main.ScreenToWorldPoint(Mouse.current.position.ReadValue());
    Physics2D.RaycastAll(mousePostion, Vector2.zero);
}
Looking at the documentation for this method we notice that it returns an array of RaycastHit2D objects. These objects contain information about what our ray hit. Therefore, when creating our method, we need to store these RaycastHits within an array:
void Update()
{
    Vector2 mousePostion = Camera.main.ScreenToWorldPoint(Mouse.current.position.ReadValue());
    RaycastHit2D[] hits = Physics2D.RaycastAll(mousePostion, Vector2.zero);
}
Finding Top Hit
Now that we have a array of all of our hits, we can compare these hits to see which is lowest on the Y Axis, this will give us our top object within our scene.
First, let’s check if we have any hits in our list:
if (hits.Length > 0)
{

}
else
{

}
Next, if we do have hits, let’s store our initial hit item as a new variable named topHit:
if (hits.Length > 0)
{
    RaycastHit2D topHit = hits[0];


}
else
{

}
Next, let’s iterate over our hits array to see which object is lower on the Y axis:
if (hits.Length > 0)
{
    RaycastHit2D topHit = hits[0];
    for(int i = 0; i<hits.Length; i++)
    {
        if (hits[i].transform.position.y > topHit.transform.position.y)
        {
            topHit = hits[i];
        }
    }
}
else
{

}
Current Interactable
Now that we have a way to find the object from our raycast, let’s create a global variable that will dynamically store the current object we are over. We can make this a GameObject variable named currentInteractable:
GameObject currentInteractable;
Then, in our if/else statement, let’s set our currentInteractable to be either null or take the value of our topHitgame object:
if (hits.Length > 0)
{
    RaycastHit2D topHit = hits[0];
    for(int i = 0; i<hits.Length; i++)
    {
        if (hits[i].transform.position.y > topHit.transform.position.y)
        {
            topHit = hits[i];
        }

        currentInteractable = topHit.transform.gameObject;
    }
}
else
{
    currentInteractable = null;
}
Changing our Interactable Text
Now that we have access to our current interactable, let’s make sure that our system is working by showing the name of our current object using the UI within our template.
First, let’s make sure that we are using the the TMPro namespace:
Using TMPro;
Next, lets create two variables:
- A
GameObjectvariable to hold our interactable panel. We will toggle this on and off depending on if we have a current interactable, or, in other words, are hovering over an object with a 2D collider - A
TextMeshProUGUIvariable to hold the value of text mesh object
public GameObject interactPanel;
public TextMeshProUGUI interactTextMesh;
Finally, let’s edit our Update method. Let’s write some code so that if our currentInteractable has a value, we turn on our interact panel and change our text to the name of our object. If our object is equal to null, we can set our text to be blank and turn off our panel:
if (currentInteractable != null)
{
    interactTextMesh.text = currentInteractable.name;
    interactPanel.SetActive(true);
}
else
{
    interactTextMesh.text = "";
    interactPanel.SetActive(false);
}
Lastly, let’s make sure our interact panel is set to hidden at the start of our game:
void Start()
{
    interactPanel.SetActive(false);
}
Setting up Unity
In our Unity Project, let’s move our Interactor into our GameManager so that is object is always a part of our larger GameManager object:
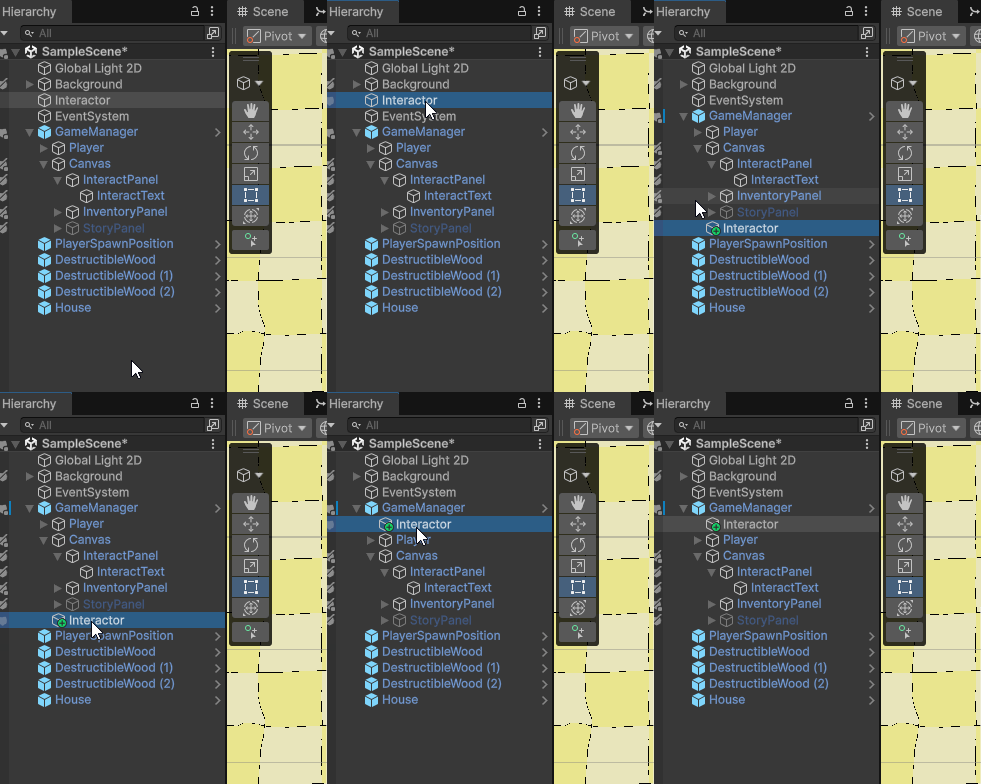
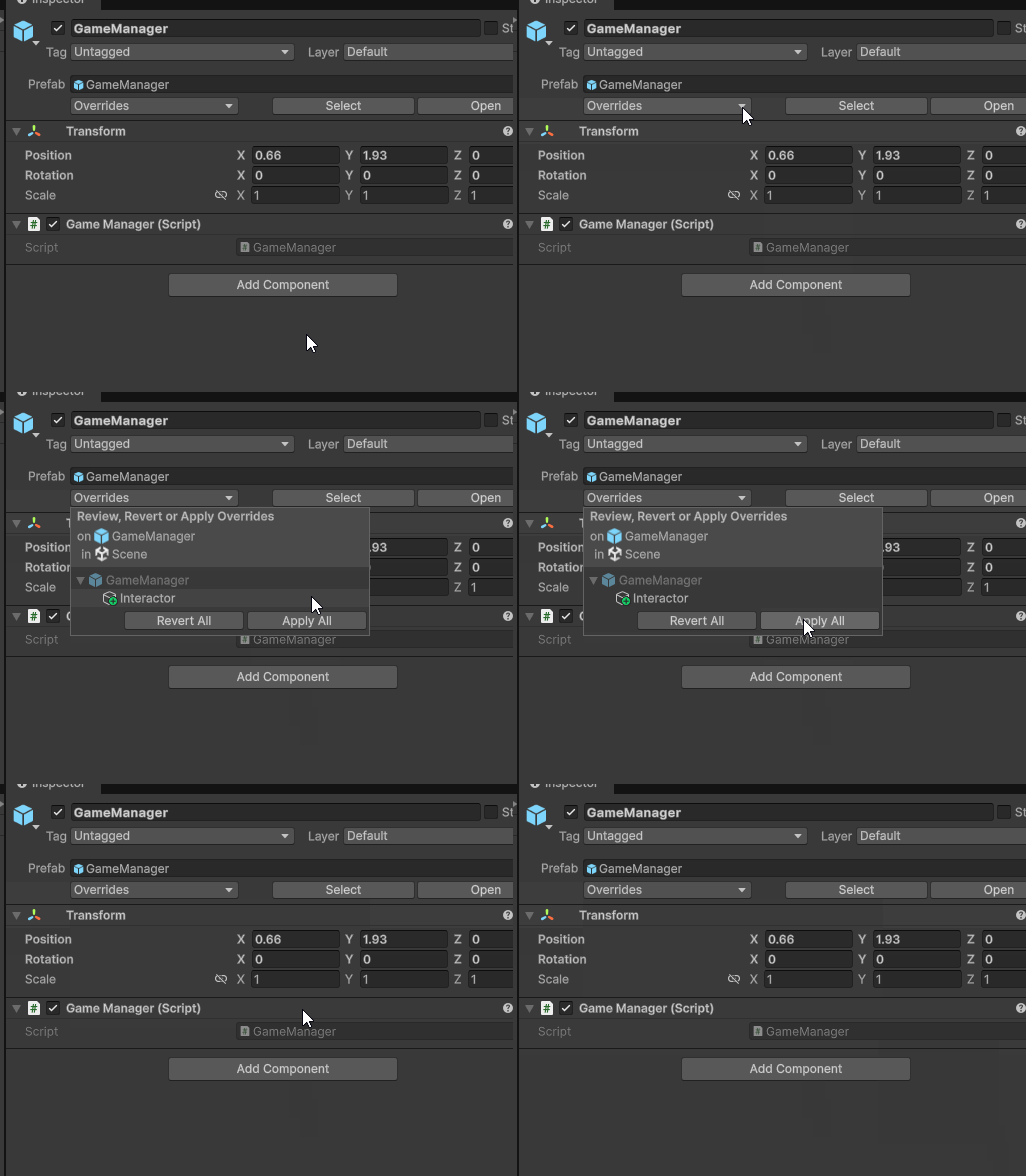
Next, let’s update our Prefab by selecting our Game Manager in our hierarchy and then by going to our Inspector Window and pressing Overrides > Apply All. This applies any changes we make to a prefab in a local scene to our main prefab.
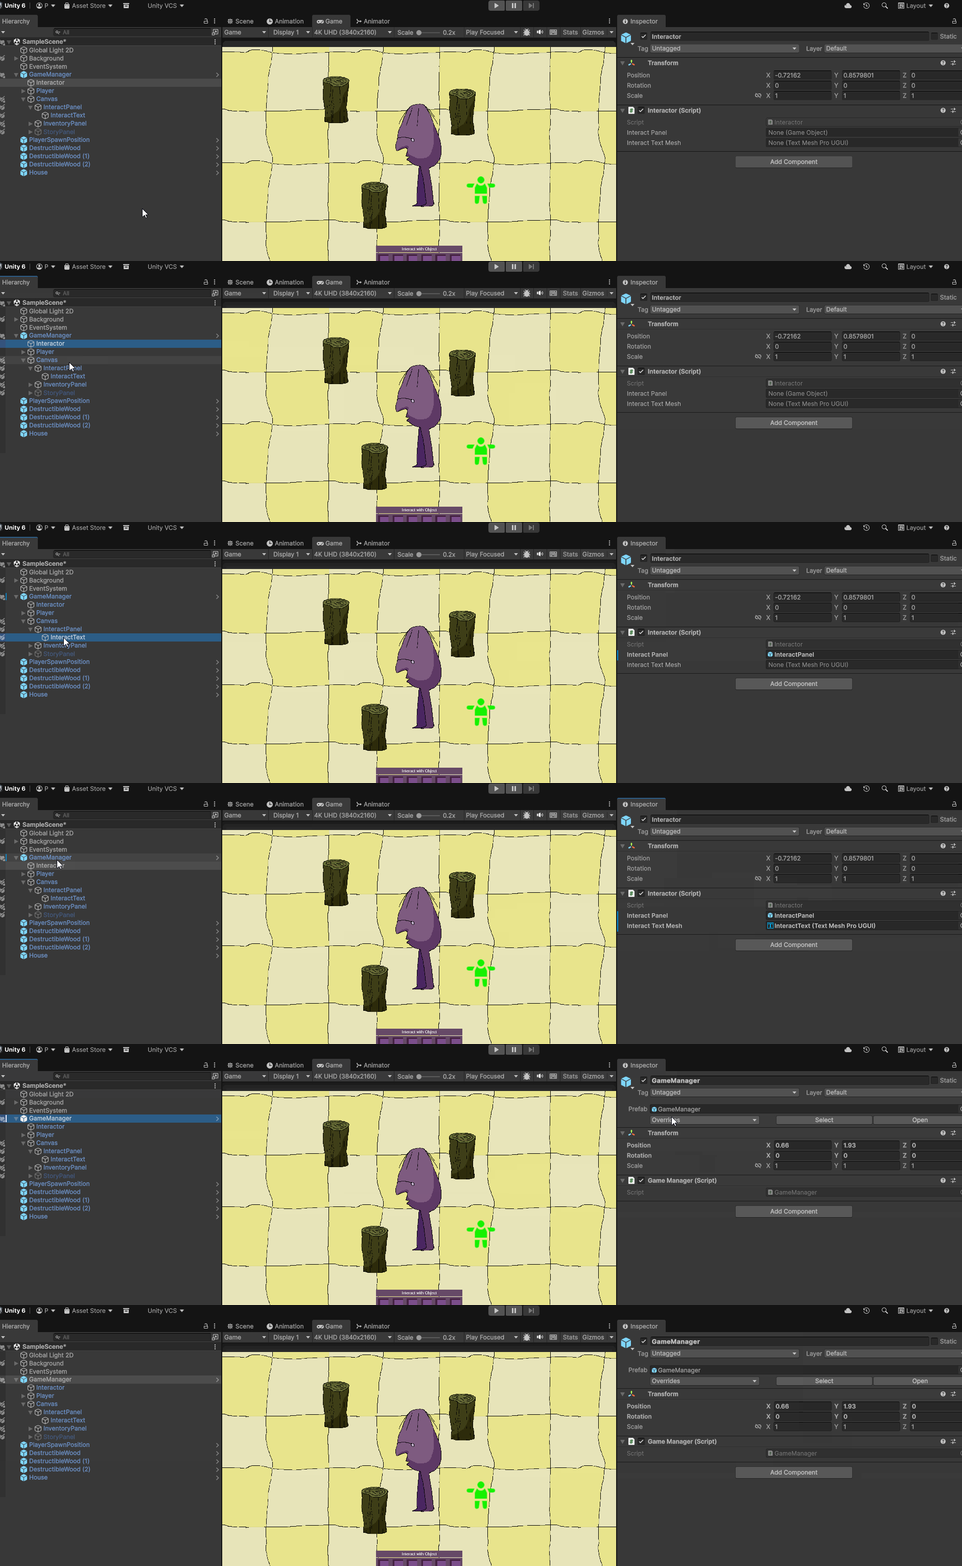
Finally, on our interactor, let’s assign our Interact Panel and Interact Text from our template UI to the variables on our interactor script. Let’s make sure to override our Game Manager prefab after we make this change:
Script and Testing
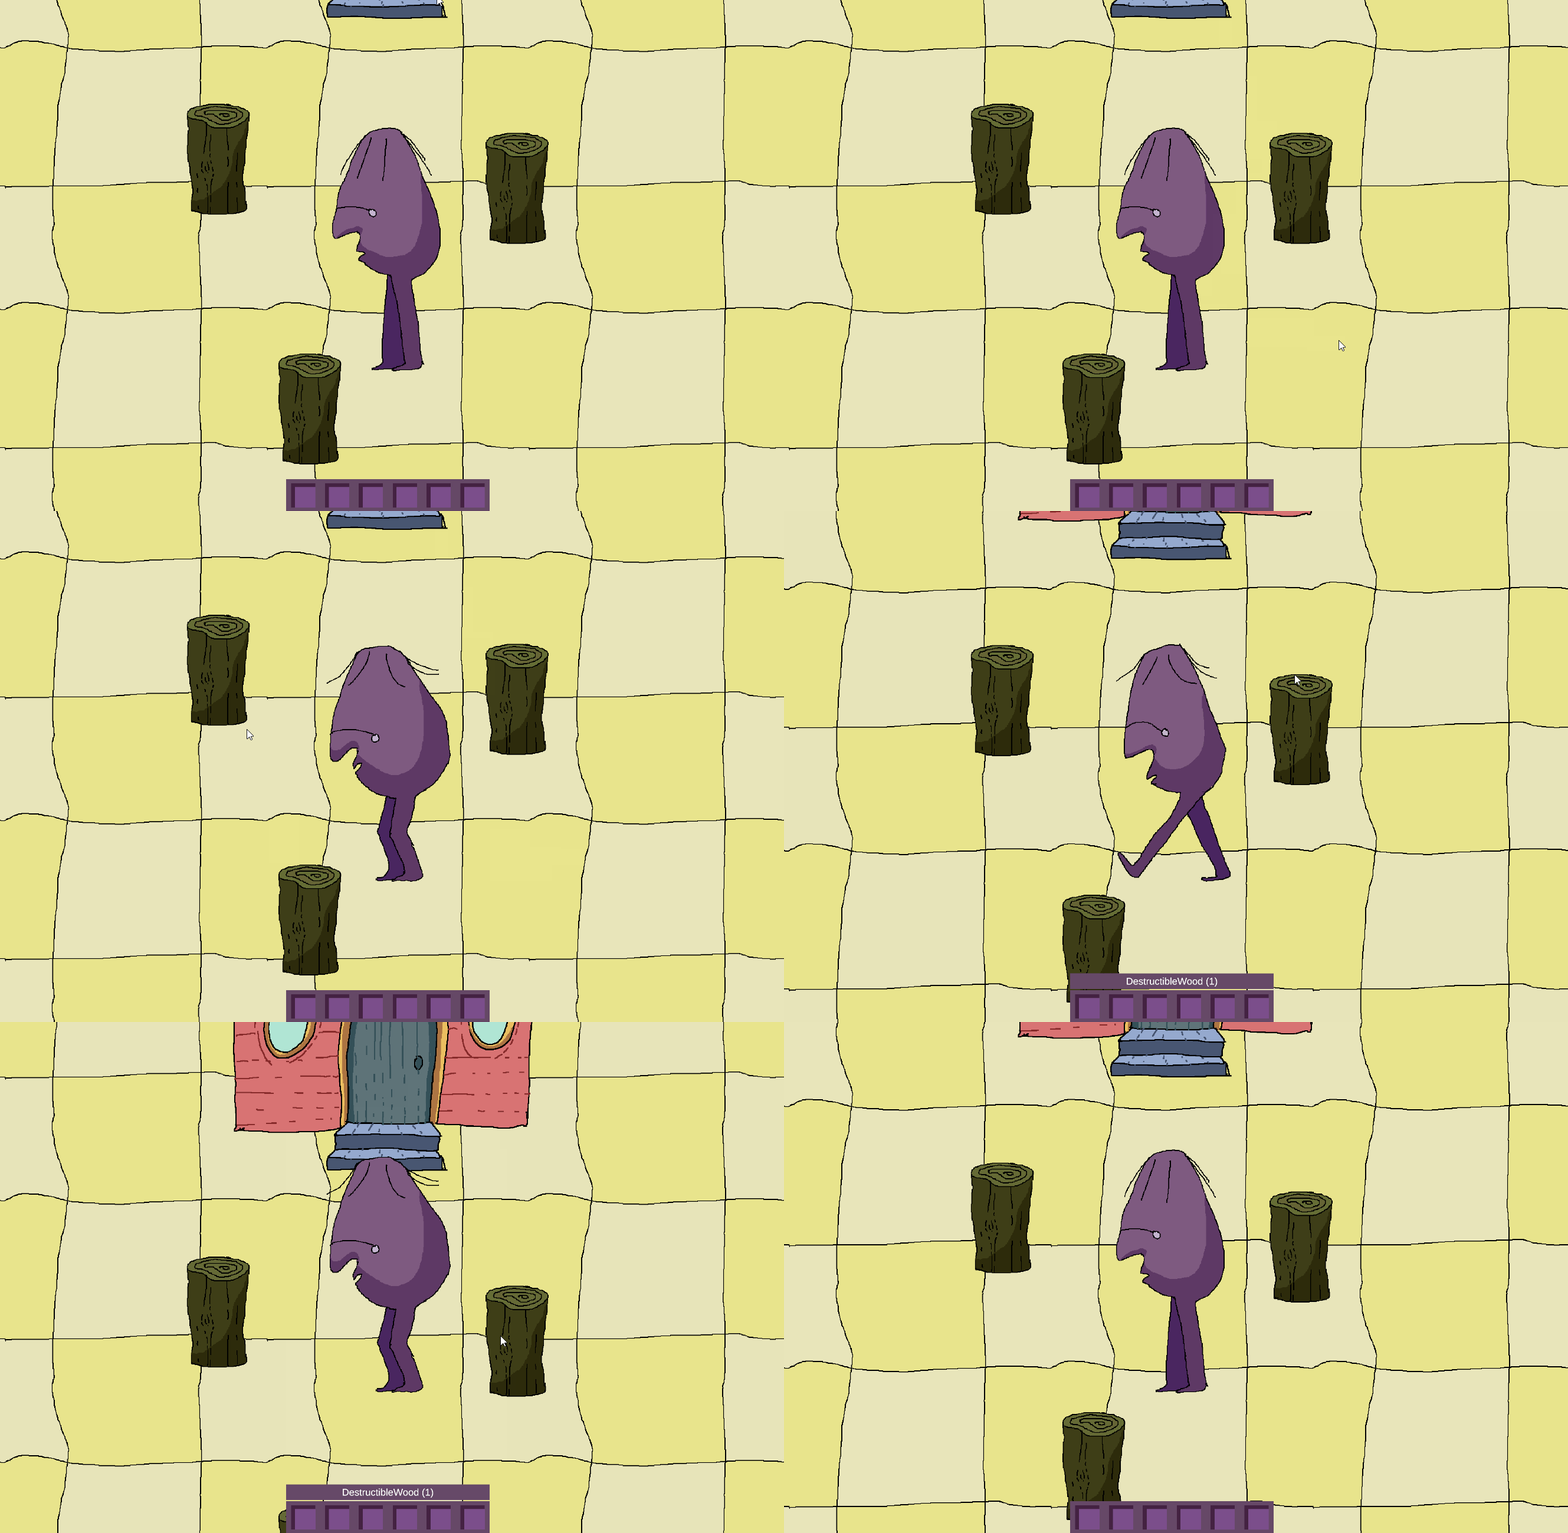
If we test our script, we should see that our UI shows the name of the object our mouse is over. Since our wood pieces and house have a 2D collider on them, they will show up in our UI:
Our Interactor script should look like this so far:
using UnityEngine;
using UnityEngine.InputSystem;
using TMPro;

public class Interactor : MonoBehaviour
{
    PActions inputActions;
    GameObject currentInteractable;
    public GameObject interactPanel;
    public TextMeshProUGUI interactTextMesh;

    private void OnEnable()
    {
        inputActions = new PActions();
        inputActions.Enable();
        inputActions.Player.Interact.performed += OnInteract;
    }

    private void OnDisable()
    {
        inputActions.Disable();
        inputActions.Player.Interact.performed -= OnInteract;
    }

    void OnInteract(InputAction.CallbackContext context)
    {
        print("interact");
    }
    void Start()
    {
        interactPanel.SetActive(false);
    }
    void Update()
    {
        Vector2 mousePostion = Camera.main.ScreenToWorldPoint(Mouse.current.position.ReadValue());
        RaycastHit2D[] hits = Physics2D.RaycastAll(mousePostion, Vector2.zero);

        if (hits.Length > 0)
        {
            RaycastHit2D topHit = hits[0];
            for(int i = 0; i<hits.Length; i++)
            {
                if (hits[i].transform.position.y > topHit.transform.position.y)
                {
                    topHit = hits[i];
                }

                currentInteractable = topHit.transform.gameObject;
            }
        }
        else
        {
            currentInteractable = null;
        }

        if (currentInteractable != null)
        {
            interactTextMesh.text = currentInteractable.name;
            interactPanel.SetActive(true);
        }
        else
        {
            interactTextMesh.text = "";
            interactPanel.SetActive(false);
        }
    }
}