User Input
In this tutorial we will learn about using Unity’s Input System to get user input to move a spacecraft.
Input System
Release in 2020, Unity updated its legacy Input Manager to the new Input System. While users are still able to access the legacy Input Manager, this system will be depreciated in all future versions of Unity. While slightly more complicated to set up, the new Input System makes it easier to create a variety of input schemes, and to control the same action with different input devices.
There are a few ways to work with the new Input system. One method is to user the Input Action Editor, which allows you to create a named control scheme for your entire project. While helpful for creating complex games that will deployed in multiple environments, for our Asteroids prototype we will follow a simpler approach of creating variables to hold our different input actions. In Unit 2, we will dive deeper into the complexities of the Input System.
Deciding Input
To get player input for any interactive artwork, there are few things that we need:
- Knowledge of the input we are looking for
- The type of data we want to read from our input
Examining the motion of the spacecraft within Asteroids, we can see that the spacecraft only moves in its forward direction when the player presses the up arrow. We also notice that the longer the player holds down the key, the faster the player moves.
Since we will be using the physics system to move our player, we can use the AddForce() method, which pushes a rigid body in a chosen direction. Considering that we are pressing down a single key to move are spacecraft forward, one method would be to look at the value of a key being pressed, either 0 for not pressed and 1 for pressed. We could then use this value within our AddForce() method to decide if our spacecraft should receive a force.
Creating Spacecraft
To begin, we need to create a spacecraft:
- Create a Triangle sprite
- Name it Player
- Scale it to around .5 on the X axis
- Add a Rigidbody2D component
- Set the Gravity Scale within the component to 0
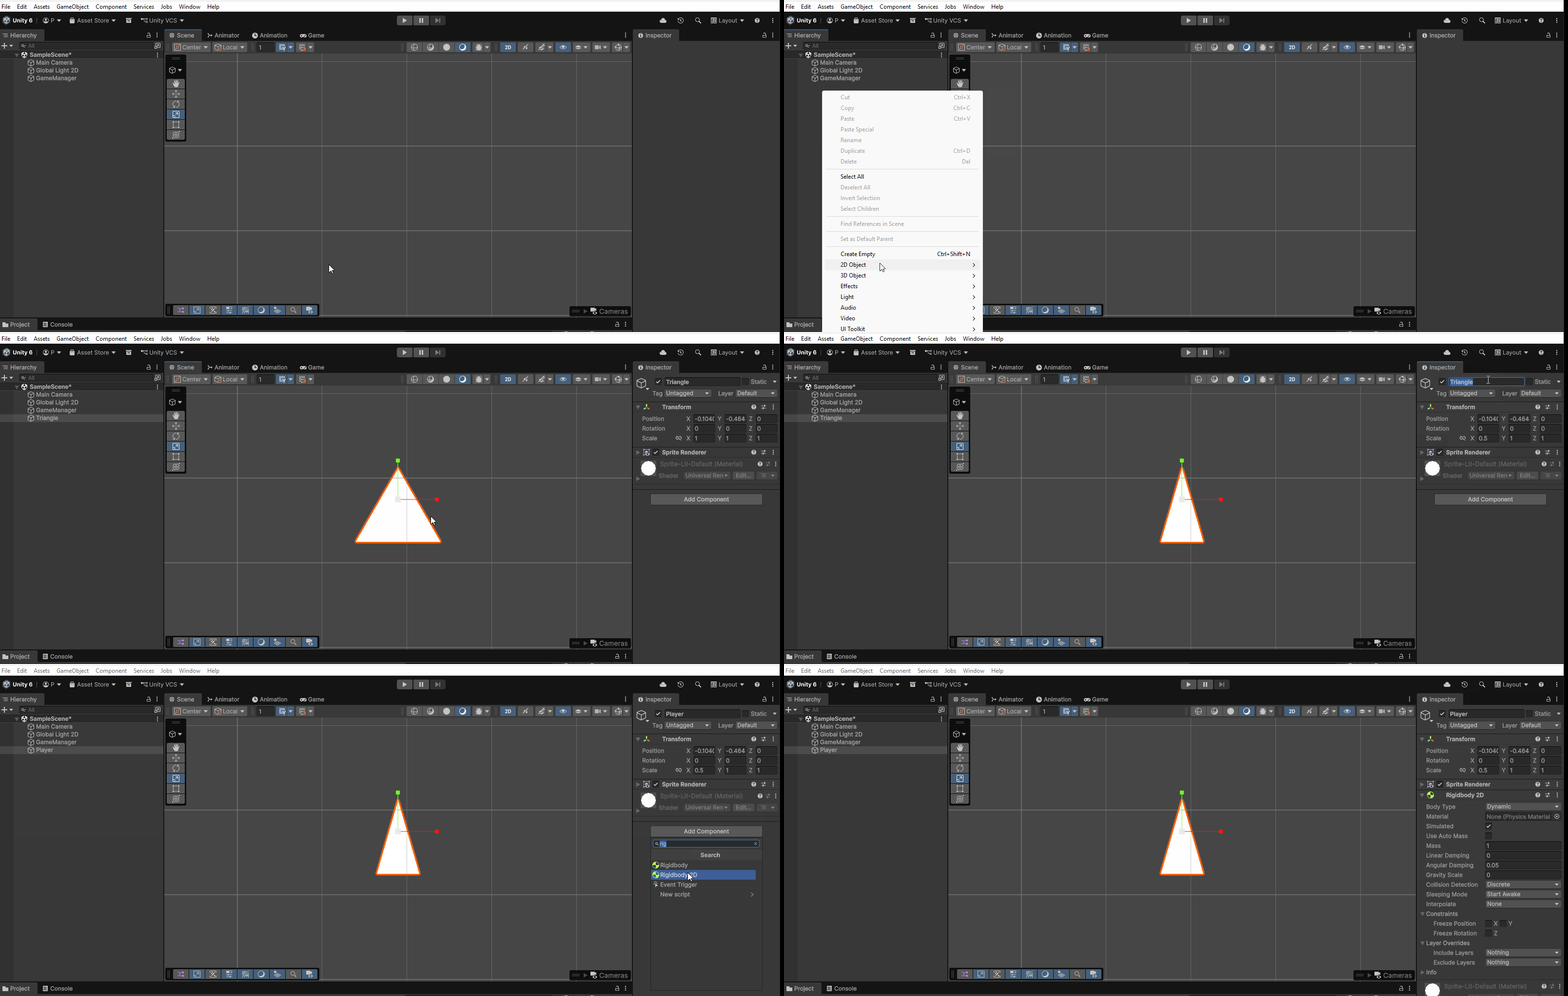
Additionally, create a Spacecraft script and add it to your Player.
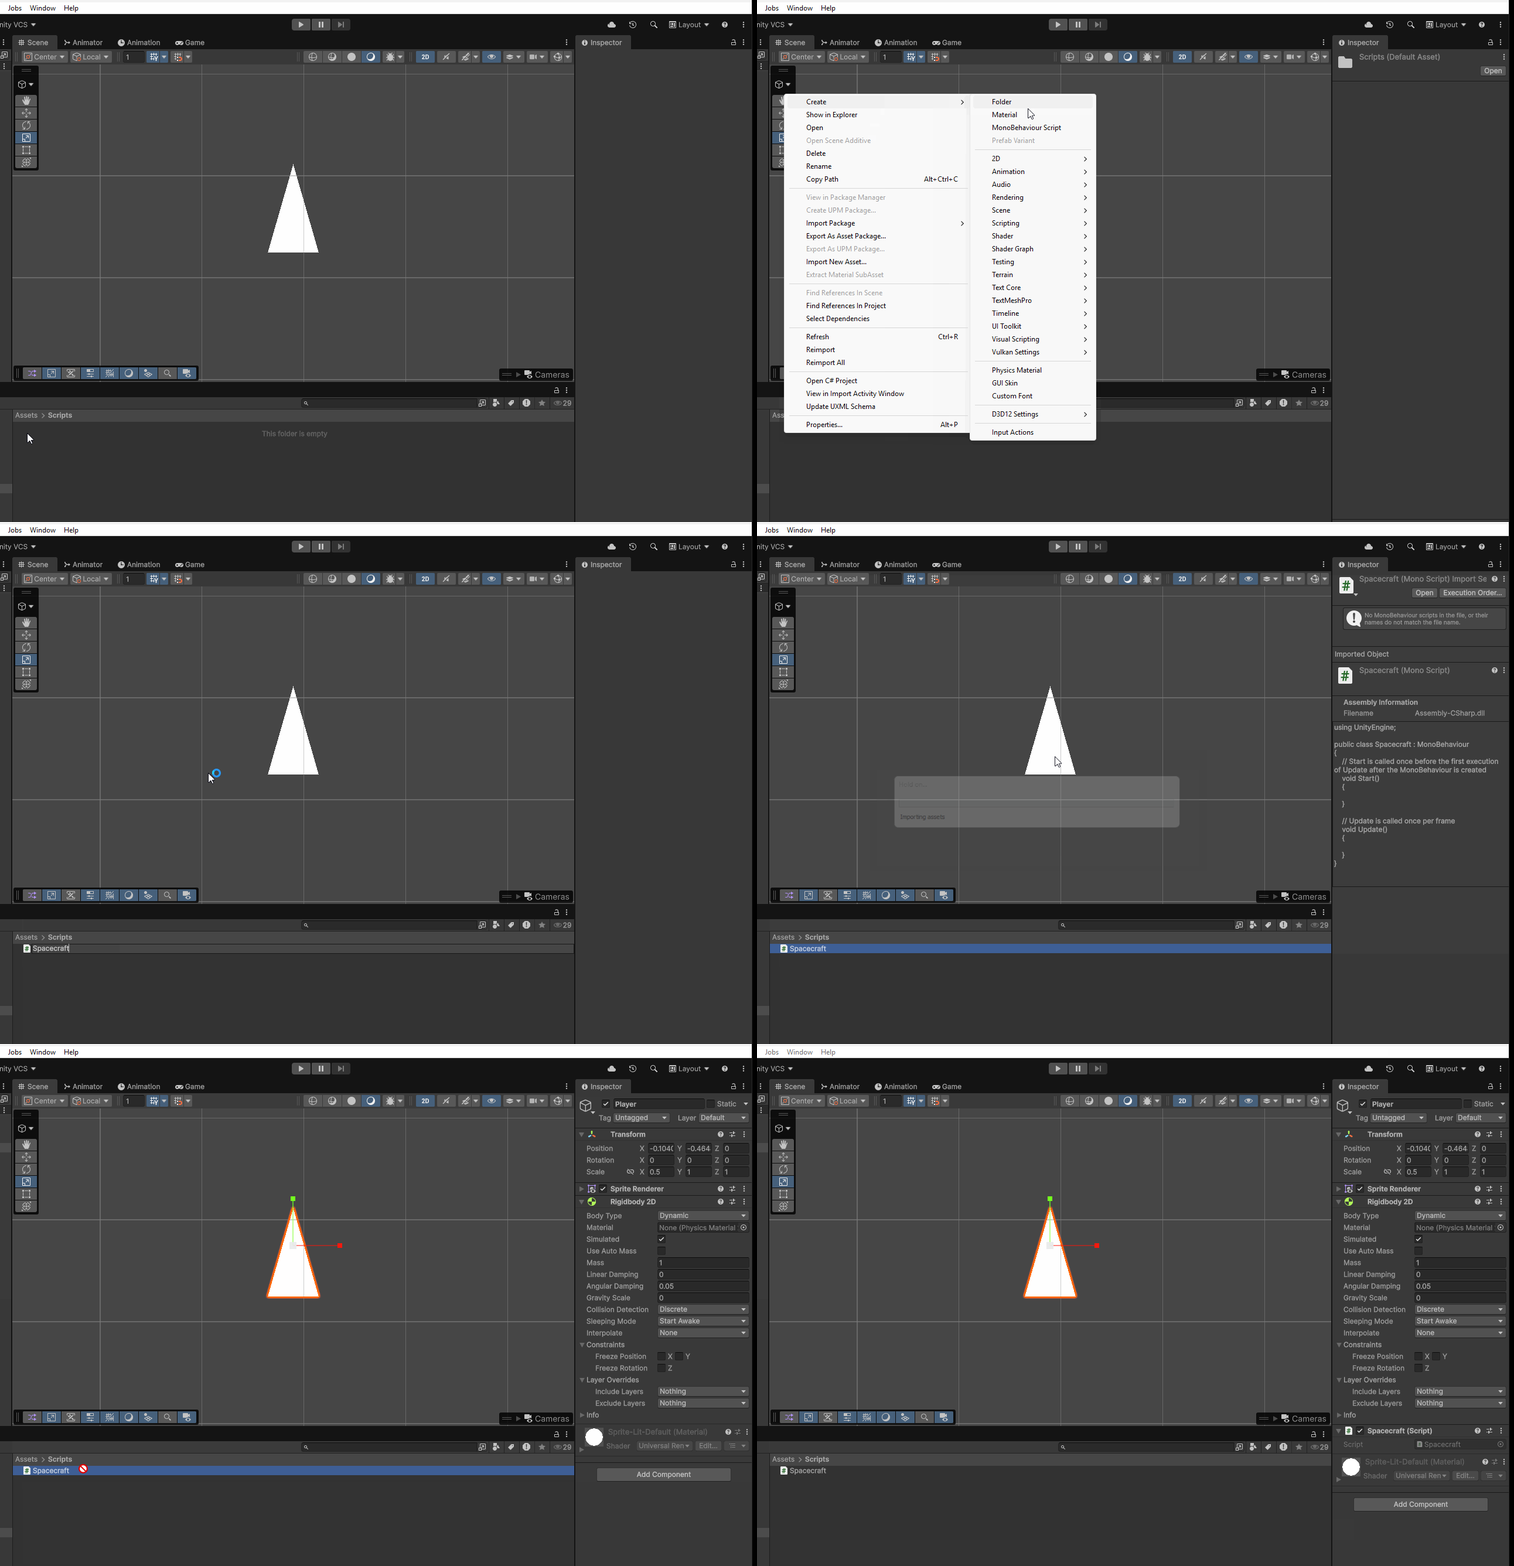
Note
In this example our asteroid game objects have been disabled by using the check box next to the game objects name in the Inspector window.

InputAction
Creating InputAction variable
Within our Spacecraft.cs file, we can create a variable to store an input that will be used to add thrust to our spacecraft. The data type we will use is InputAction, an input signal that lets us decide which type of input we want to use. In order to create an Input Action variable, we first need to import the Input System library by adding the line Using UnityEngine.InputSystem at the top of our script.
using UnityEngine;
using UnityEngine.InputSystem;
We can then add a InputAction variable named moveAction, giving it a public accessibility level.
using UnityEngine;
using UnityEngine.InputSystem;

public class Spacecraft : MonoBehaviour
{
    public InputAction moveAction;

//...
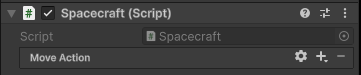
In our Spacecraft component within the Unity Editor, we will notice we now have a property for adding a Move Action input:
Editing InputAction
To edit our Move Action, we can first click on the + symbol which will allow us to choose a binding. Since for our move action we only need to capture a value of 0 or 1, we can choose, Add Binding:
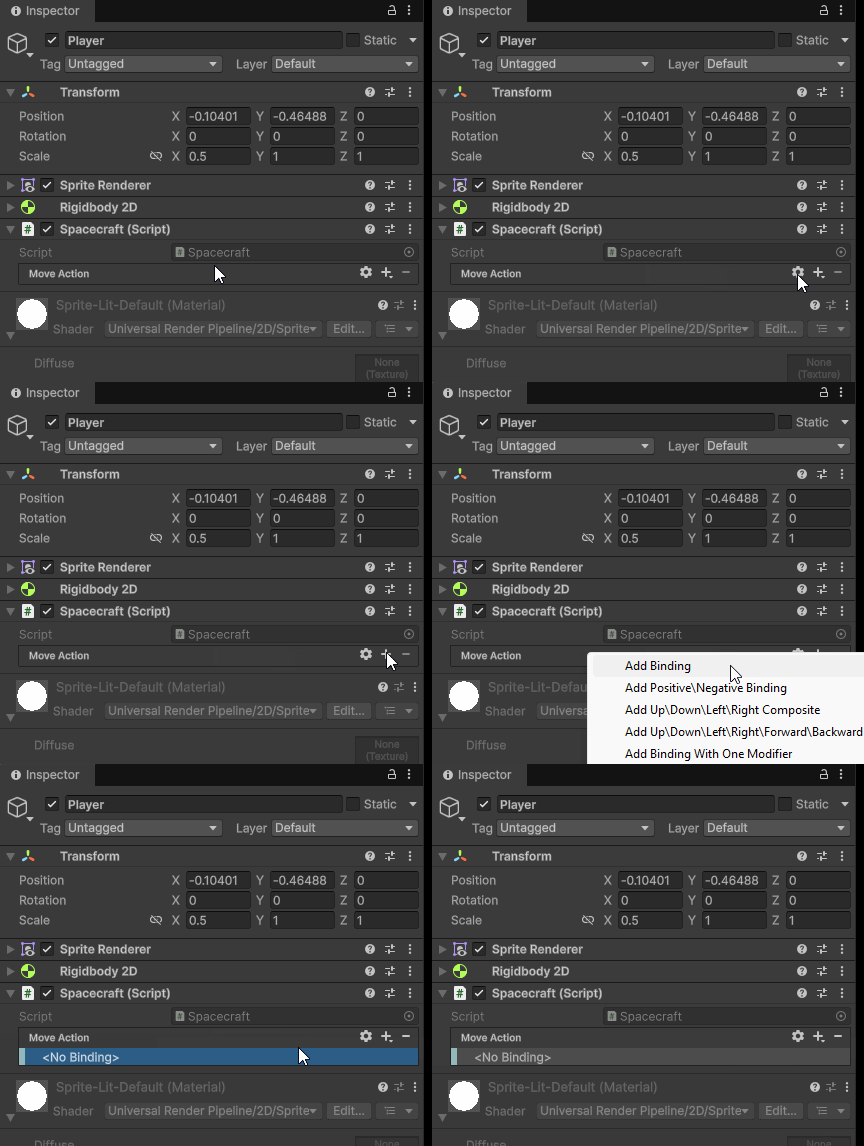
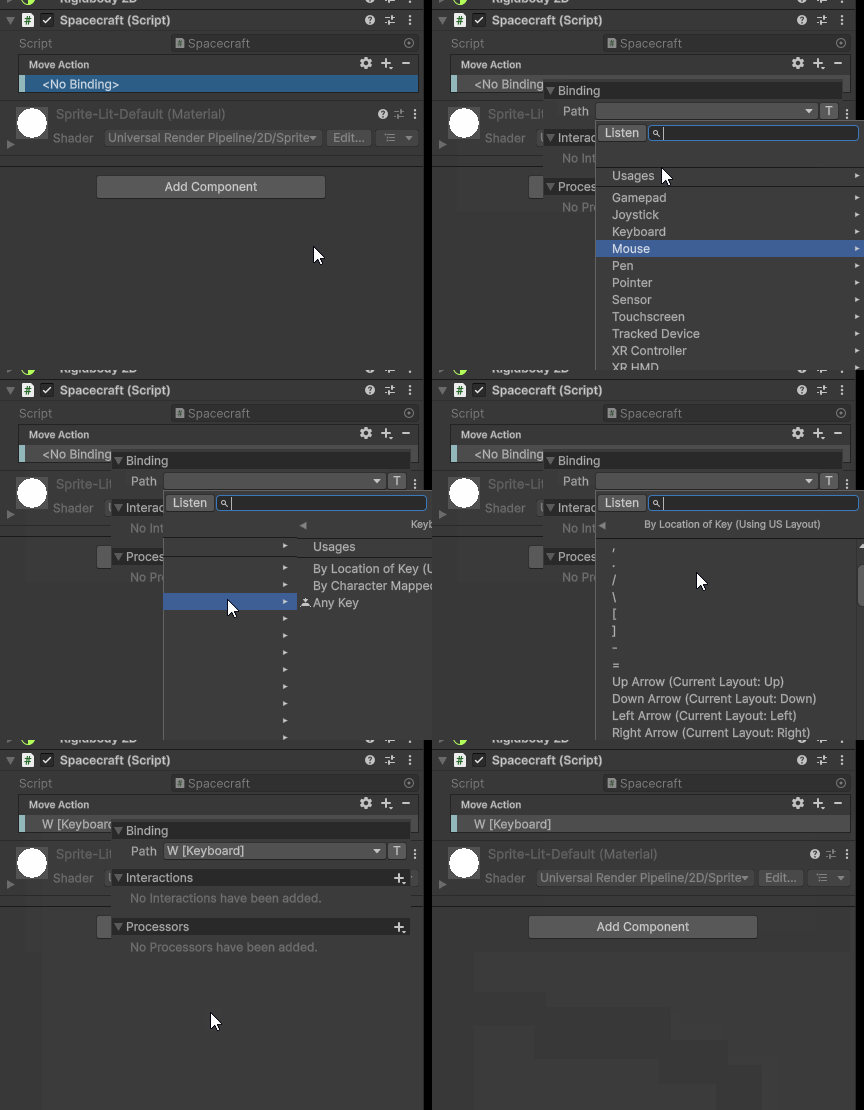
With a binding now added to our Move Action, we can decide what input we want to be associated with our Move Action. To assign an input:
- Double Click on the binding
- Select the Path drop down.
- Either select from menu or choose Listen
We will assign a value W to our input:
Reading Values from Input Actions
Now that we have our Move Action bound to a particular key, we can return to our script to read a value from our InputAction.
Enabling and Disabling Input Actions
To begin, the Input System require of to enable and disable InputAction variables when the game starts and begins. To do this we will use the OnEnable() and OnDisable() methods to call InputAction.Enable() and InputAction.Disable(), respectively.
using UnityEngine;
using UnityEngine.InputSystem;

public class Spacecraft : MonoBehaviour
{
    public InputAction moveAction;

    private void OnEnable()
    {
        moveAction.Enable();
    }

    private void OnDisable()
    {
        moveAction.Disable();
    }

//...
Reading Values
To read the value of our Move Action, lets first create a variable that will store the read value.
float moveInput;
Since we will be moving our spacecraft using the physics system, let’s read and assign our Move Action value within the FixedUpdate() function. To read the value from our Input Action, we can use InputAction.ReadValue<>() method. To use this method, we write the name of the date type we are trying to read with the carrot brackets. In our case, this will be a float.
void FixedUpdate()
{
    moveInput = moveAction.ReadValue<float>();
}
moveInput will be checking our value of our moveAction every physics update. We can then use this value to move our spacecraft. At this point, our script should match the below code. Our next step is to get our rigid body and to move our spacecraft:
using UnityEngine;
using UnityEngine.InputSystem;

public class Spacecraft : MonoBehaviour
{
    public InputAction moveAction;
    float moveInput;

    private void OnEnable()
    {
        moveAction.Enable();
    }

    private void OnDisable()
    {
        moveAction.Disable();
    }

    void Start()
    {

    }

    void Update()
    {

    }

    void FixedUpdate()
    {
        moveInput = moveAction.ReadValue<float>();
    }
}
AddForce and Moving Spacecraft
Now that we are reading our Move Action input, we can move our spacecraft using this value. To start lets begin by creating two variables that can hold our Rigidbody2d and how fast we want our spacecraft to move. We’ll make our movePower variable public so we can change it later in the inspector to tweak the speed of our spacecraft.
Rigidbody2D rBody;
public float movePower = 15f;
Let’s also make sure we are assigning our rBody variable within our Start() method.
void Start()
{
    rBody = GetComponent<Rigidbody2D>();
}
AddForce
To move our spacecraft, we will use the method AddForce(). This method applies a force to our rigid body based on the Vector2 value we provide it. To find the Vector2 by which to move our spacecraft, we need to analyze the direction the spacecraft in moving in Asteroids.
Looking at the game, we can notice that the spacecraft, no matter which way it is rotated, is always moving in its forward direction. In our script, we need to find a way to get the forward vector of our spacecraft.
Transform Directions
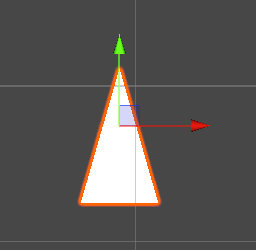
To do this, we can look at our spacecraft’s Transform component. As discussed earlier, this component contains data on our game object such as position, rotation and scale. Since it contains this data, the Transform component also contains information about which way our object is facing. Examing the documentation for the Transform component, we can notice it contains accessible properties such as up, forward and right. Each of the properties contains the x, y, or z axis of our game object. In our case, working in a 2D space and looking at the axis of our spacecraft, we can notice that direction we want to move our spacecraft is along the green axis, or the up direction.
Equation for Moving Spacecraft
Since we want to move our spacecraft in the direction of transform.up, the equation for the Vector2 value we want to add to our AddForce() method will be the up direction, multiplied by our read input, multiplied by our power, finally, multiplied by the time from the last FixedUpdate(): transform.up * moveInput * movePower * Time.fixedDeltaTime
void FixedUpdate()
{
    moveInput = moveAction.ReadValue<float>();
    Vector2 moveForce = transform.up * moveInput * movePower * Time.fixedDeltaTime;
    rBody.AddForce(moveForce);
}
ForceMode2D
Examining the documentation for AddForce(), we can notice that it takes in a second parameter of type ForceMode2D. The parameter determines how force will be added to our rigid body. By default, AddForce() will add force generically using a ForceMode2D.Force, which adds a force to our rigid body over time.
Since we are simulating a spacecraft and adding a explosion of force all at once, we can instead use the ForceMode2D called Impluse (Unity Reference). This will add an instant force, mimicking the thrusting effect seen in Asteroids.
rBody.AddForce(moveForce, ForceMode2D.Impulse);
At this point, our code should look like this:
using UnityEngine;
using UnityEngine.InputSystem;

public class Spacecraft : MonoBehaviour
{
    public InputAction moveAction;
    float moveInput;
    Rigidbody2D rBody;
    public float movePower = 15f;

    private void OnEnable()
    {
        moveAction.Enable();
    }

    private void OnDisable()
    {
        moveAction.Disable();
    }
    void Start()
    {
        rBody = GetComponent<Rigidbody2D>();
    }
    void Update()
    {

    }

    void FixedUpdate()
    {
        moveInput = moveAction.ReadValue<float>();
        Vector2 moveForce = transform.up * moveInput * movePower * Time.fixedDeltaTime;
        rBody.AddForce(moveForce, ForceMode2D.Impulse);
    }
}
Adding Drag
When playing our game, we will notice that our rigid body doesn’t slow down.
To correct this, let’s increase the Linear Damping of our rigid body to 1. This will add some drag to slow our rigid body down over time.
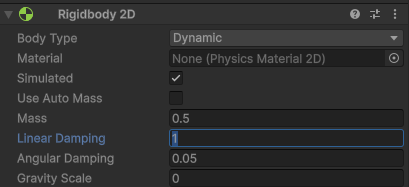
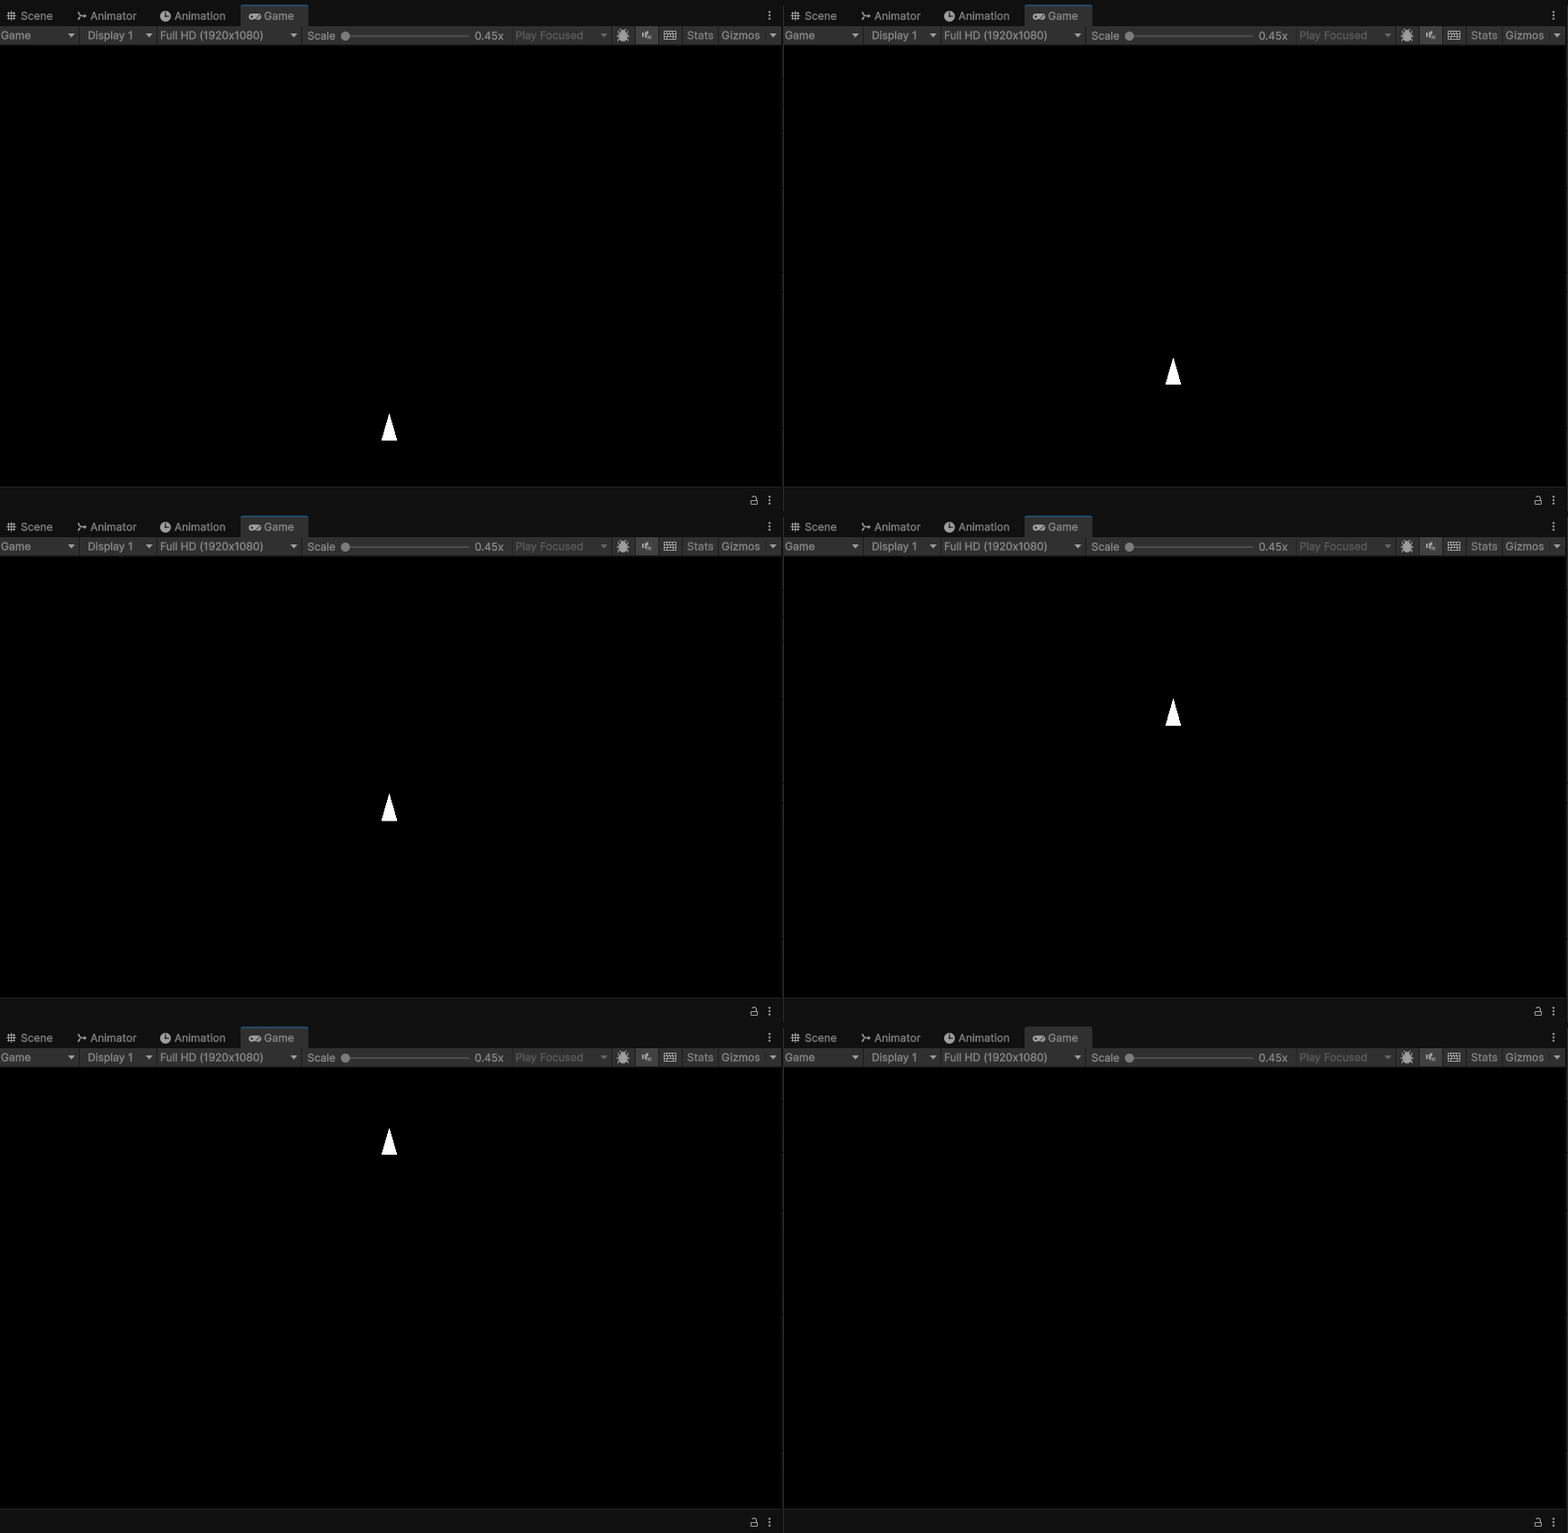 Tapping the Move Action with no linear damping
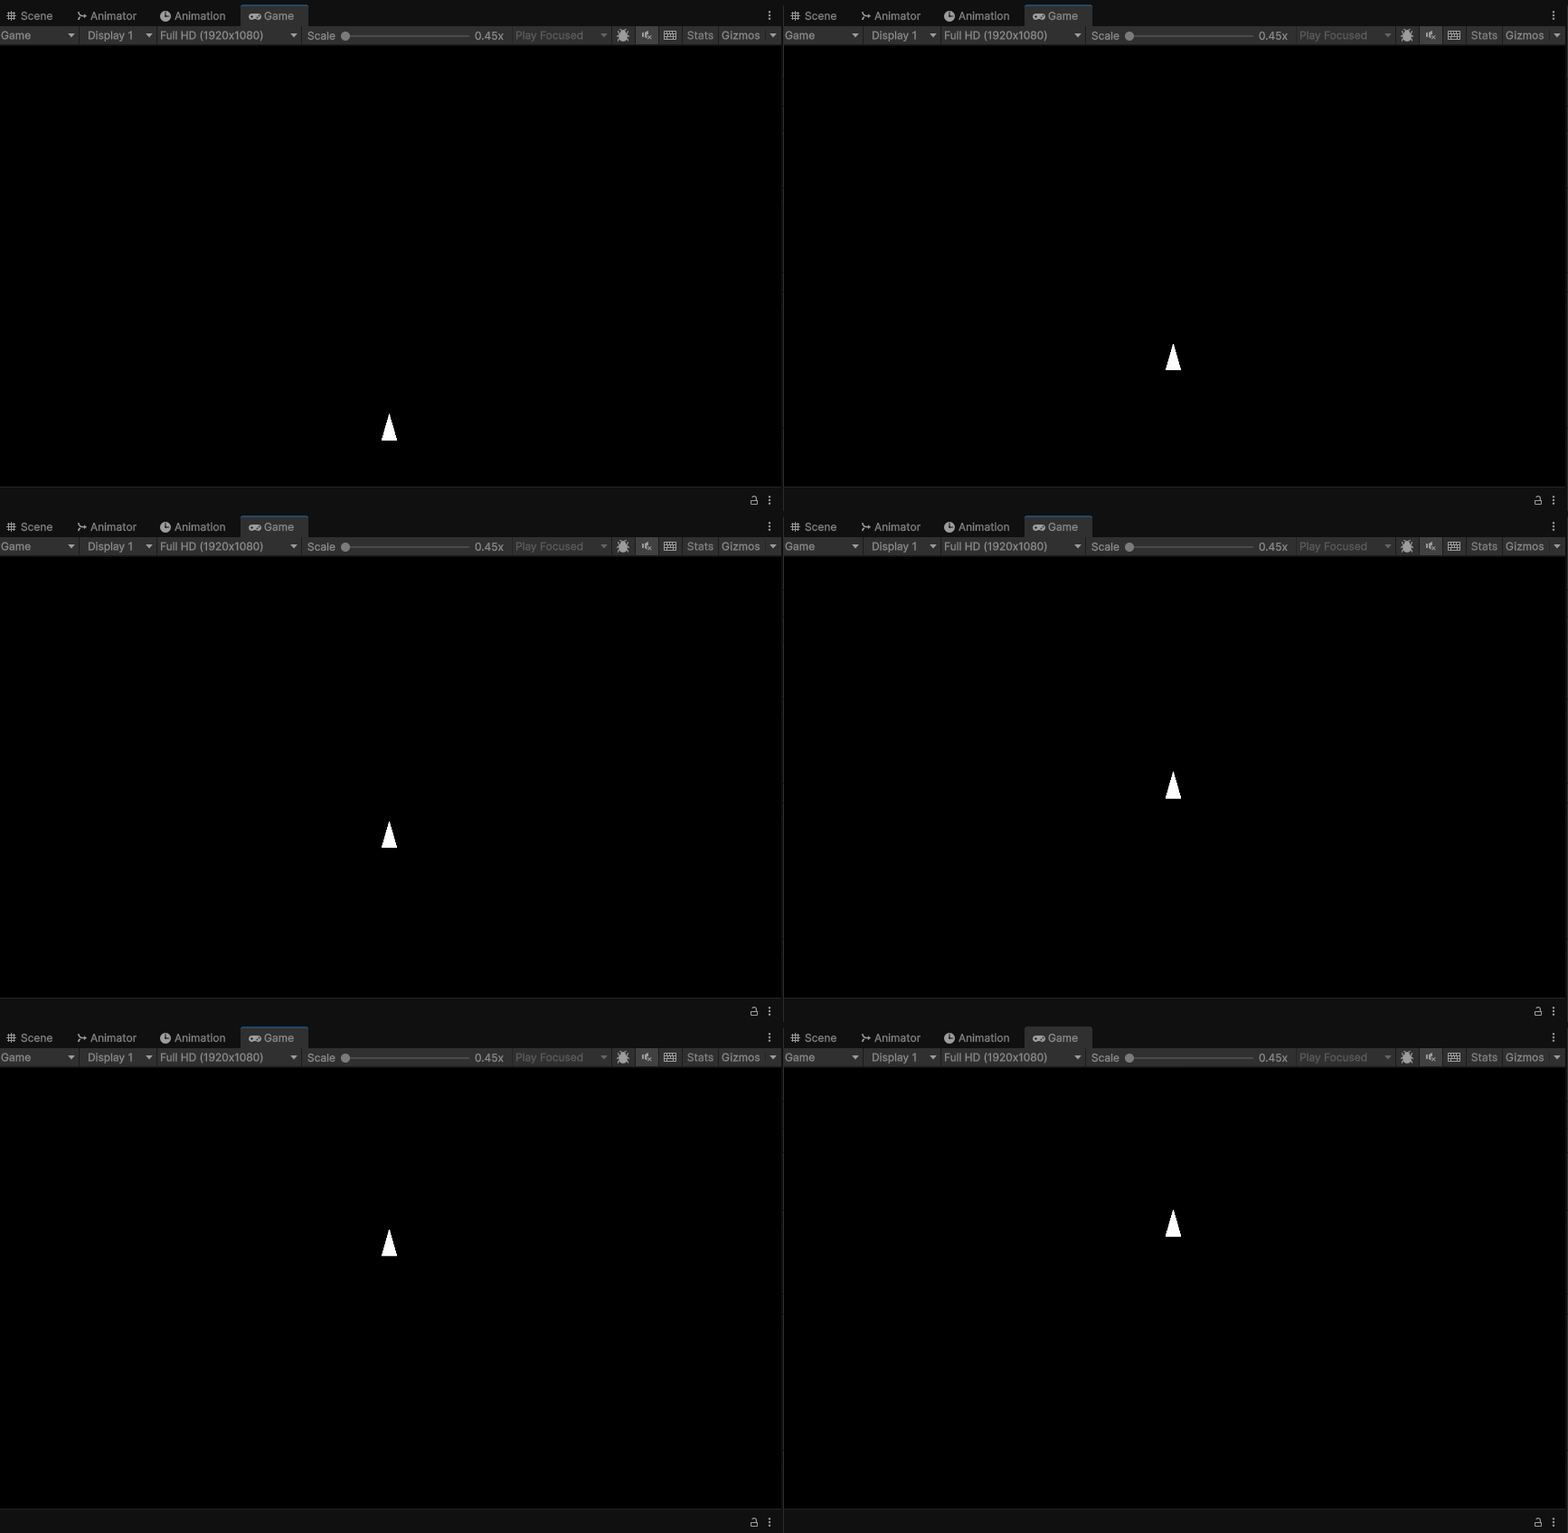 Tapping the Move Action with linear damping equal to 1
Add ScreenWrap.cs
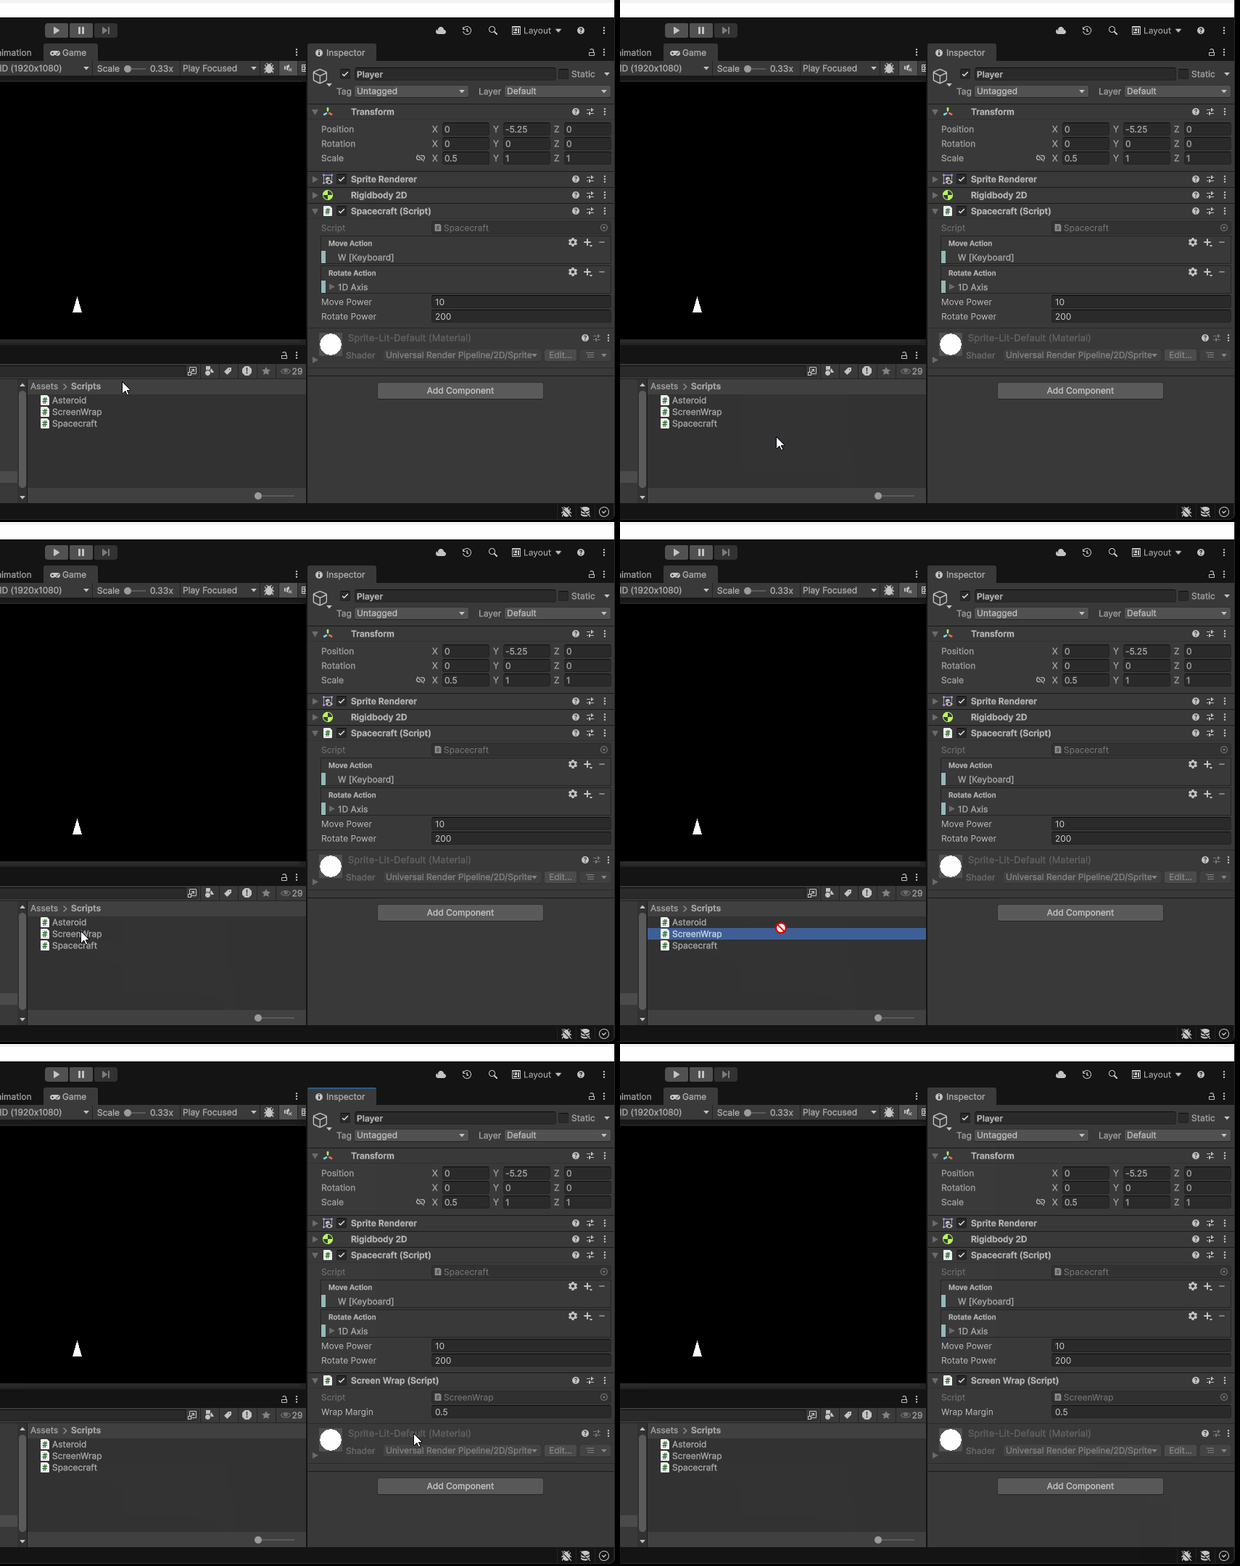
To make our player wrap around the screen. Add the ScreenWrap component we made to our Player game object.
MoveRotation
To rotate our spacecraft we can use the method MoveRotation. Move rotation takes in a float for the angle to rotate a rigid body towards.
Getting Input
We notice in Asteroids that the spacecraft can rotate in either direction. Unlike our Move Action, which moves our player in a single direction, to rotate our spacecraft we need to be able to rotate in both the positive and negative direction. To get a value of either -1 or 1 from our input, we can use a Postive\Negative Binding which will allow us to bind one key to 1 and one key to -1.
Lets first begin by creating an InputAction variable named rotateAction.
public InputAction rotateAction
Within the Unity Editor, let’s assign this value a Positive\Negative Binding and set Negative to the D key and Positive to the A key.
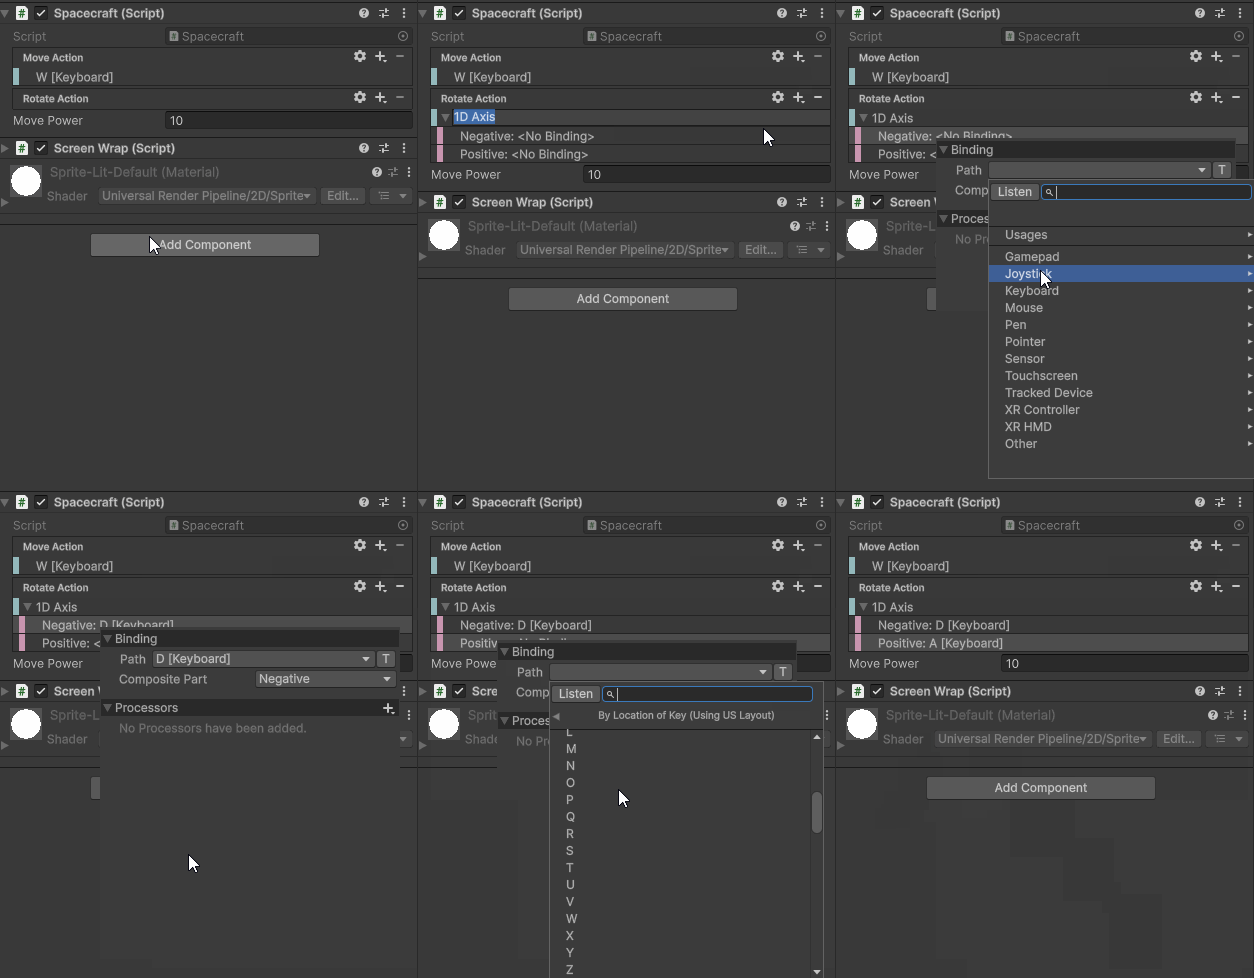
Within our Spacecraft.cs file, let’s make sure we enable and disable our rotateAction
private void OnEnable()
{
    moveAction.Enable();
    rotateAction.Enable();
}

private void OnDisable()
{
    moveAction.Disable();
    rotateAction.Disable();
}
Reading Input
Similar to our Move Action Input Action, to work with our Rotate Action, lets add two additional variables to our script.
- A
floatvariable that will store the read value from our rotate action - A
floatvalue that will use to control the speed our rotation
float rotateInput;
public float rotatePower = 200f;
Let’s read the input from our Rotate Action in our FixedUpdate() method.
void FixedUpdate()
{
	rotateInput = rotateAction.ReadValue<float>();
    moveInput = moveAction.ReadValue<float>();


    Vector2 moveForce = transform.up * moveInput * movePower * Time.fixedDeltaTime;
    rBody.AddForce(moveForce, ForceMode2D.Impulse);
}
Rotating the spacecraft
To rotate the spacecraft we need to provide the MoveRotation() method with the angle we want to rotate towards. To do this, within our FixedUpdate() we can take our current rotation and then add our rotation input. Then, we can multiply this value by our rotatePower and Time.fixedDeltaTime:
float newRotation = rBody.rotation + rotateInput * rotatePower * Time.fixedDeltaTime;
We can then provide this newRotation to our MoveRotation() method:
rBody.MoveRotation(newRotation);
Our final Spacecraft.cs file will look like this:
using UnityEngine;
using UnityEngine.InputSystem;

public class Spacecraft : MonoBehaviour
{
    public InputAction moveAction;
    public InputAction rotateAction;
    float moveInput;
    float rotateInput;
    Rigidbody2D rBody;
    public float movePower = 15f;
    public float rotatePower = 200f;

    private void OnEnable()
    {
        moveAction.Enable();
        rotateAction.Enable();
    }

    private void OnDisable()
    {
        moveAction.Disable();
        rotateAction.Disable();
    }

    void Start()
    {
        rBody = GetComponent<Rigidbody2D>();
    }

    void Update()
    {

    }

    void FixedUpdate()
    {
        moveInput = moveAction.ReadValue<float>();
        rotateInput = rotateAction.ReadValue<float>();

        Vector2 moveForce = transform.up * moveInput * movePower * Time.fixedDeltaTime;
        rBody.AddForce(moveForce, ForceMode2D.Impulse);

        float newRotation = rBody.rotation + rotateInput * rotatePower * Time.fixedDeltaTime;
        rBody.MoveRotation(newRotation);
    }
}